
Vue3小兔鲜电商前台项目
Vue全家桶
- create-vue
- Pinia
- ElementPlus
- Vue3-Setup
- Vue-Router
- VueUse


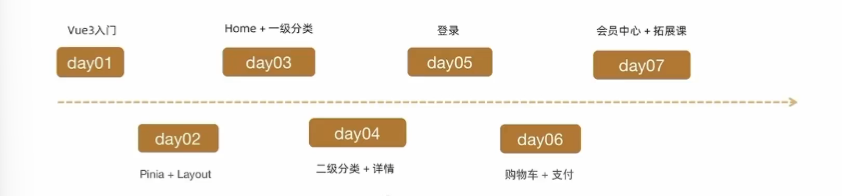
课程进度
适合人群
- 如果已经学过Vue2,想要进阶Vue3
- 如果学过Vue3基础,但是苦于没有项目练手
- 想要跳过Vue2直接上手Vue3的小伙伴们
- 如果想快速了解Vue技术栈的后端开发
为什么要学习Vue3
- 许多岗位有对Vue3的要求
- Vue3已经作为默认版本发布,是现在和将来的主流版本
组合式Api体验
- 通过一个Counter案例 体验Vue3新引入的组合式API
- Vue2:
<template>
  <button @click="addCount">{{count}}</button>
</template>

<script>
export default {
  data() {
    return {
      count: 0
    }
  },
  methods: {
    addCount() {
      this.count++
    }
  }
}
</script>
-
- Vue3:
 <template>
  <button @click="addCount">{{count}}</button>
</template>

<script setup>
import { ref } from 'vue'
const count = ref(0)
const addCount = () => {
  count.value++
}
</script>
- 代码量降低了,分散式维护转换为集中式维护。
- Vue3的优势:
- 组合式API
- 更好的TypeScript支持
- 重写diff算法
- 模板编译优化
- 更高效率的组件初始化
- 良好的TreeShaking
- 按需引入
- Proxy
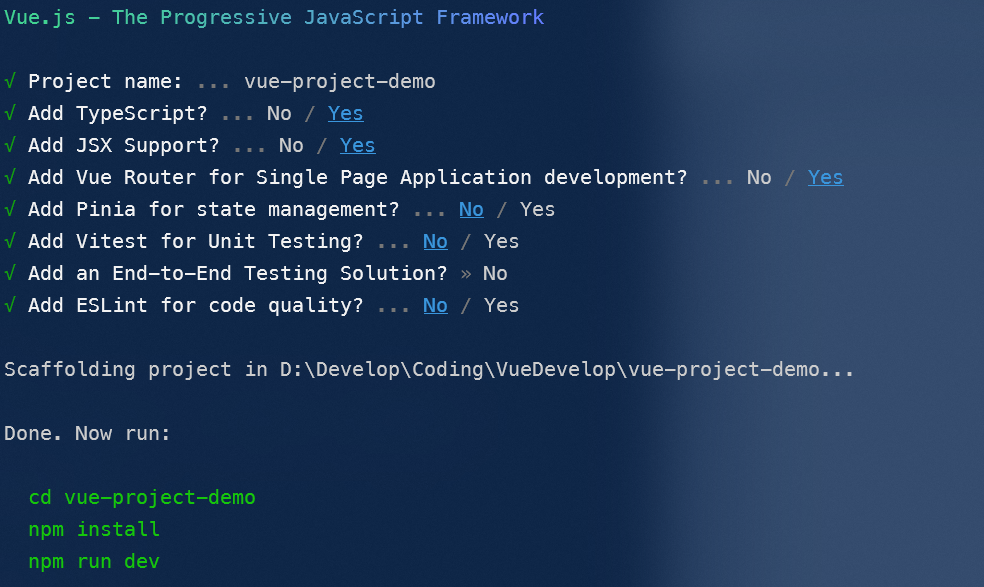
使用create-vue
create-vue是Vue官方新的脚手架工具,底层切换到了vite(下一代前端工具箱),为开发提供极速响应
- 安装前提环境
- 已经安装16.0或者更高版本的Nodejs
- 创建Vue应用
- npm init vue@latest
- 以上命令将会安装并执行create-vue
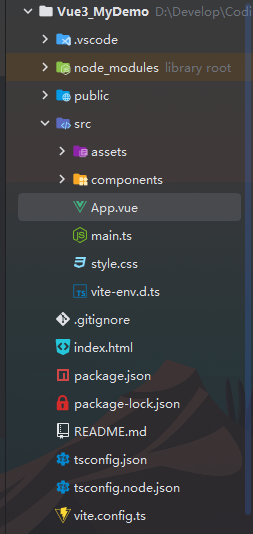
熟悉项目目录和关键文件
package.json:项目包文件
vite.config.js:配置文件
src-main.js:入口文件
-
createApp(App).mount('#app') -
- 以App为参数生成一个应用示例对象 2. 挂载到id为app的节点上
src-App.vue:界面文件
-
<script setup> </script> <template> </template> <style scoped> </style> -
将template和style放在一起可以更加便捷的开发模板和样式
-
setup是一个组合式API的开关,加上setup就可以支持组合式api
-
在Vue3中不再要求唯一根元素
组合式API - setup选项
组合式API是一系列函数,允许我们通过调用函数的方式编写组件
setup选项的写法和执行时机
-
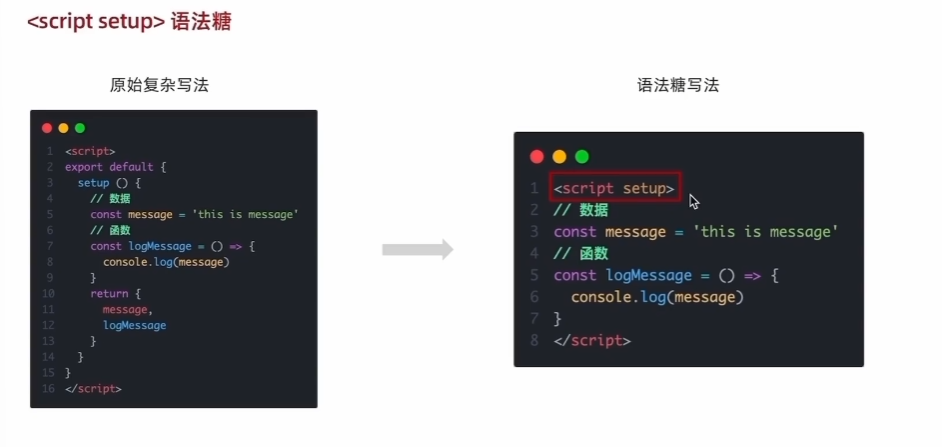
在我们不使用setup时,需要这样来定义组件:
-
在组件中导出一个组件的配置对象,其中有setup函数
-
<script> export default { setup(){ }, beforeCreate(){ } } </script> -
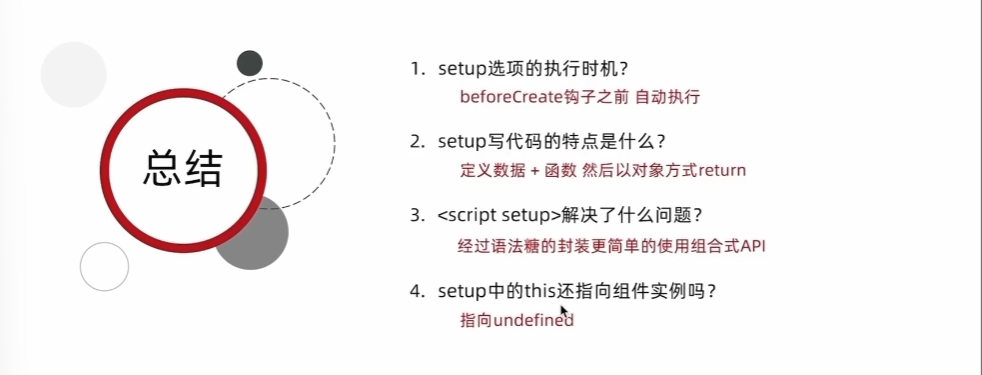
其执行时机在beforeCreate之前
-
在setup中写代码的特点
- 可以在setup中定义数据和函数
- 不使用setup的写法:
- 如果要使用定义的数据和函数,需要将其包装成对象后return出去
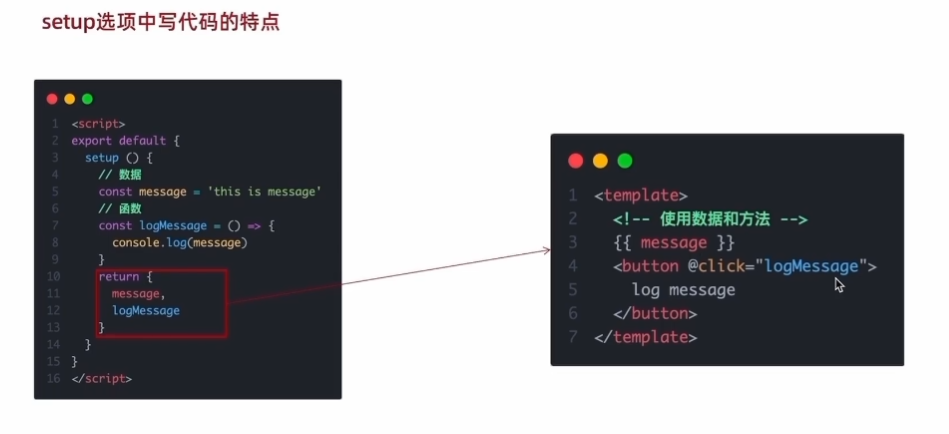
- 可以发现这里修改数据时,没有使用this关键字
- 这是因为Vue3语法风格的问题,不再推荐使用this关键字修改变量
- 如果尝试将this打印出来,也是一个undefined,获取不到组件的实例对象
- 使用setup语法糖
Vue 3 中的
setup函数是一个语法糖,用于替代 Vue 2.x 中的beforeCreate和created钩子函数。setup函数的主要作用是设置组件的初始状态、创建响应式数据、引入第三方库、注册事件处理程序等。通过使用
setup函数,可以将组件的选项配置和逻辑代码集中在一个函数中,使得代码更加简洁和易于维护。在setup函数中,你可以使用 Vue 3 提供的新的响应式 API,如reactive、ref、computed等,来定义组件的状态和计算属性。需要注意的是,
setup函数具有一些特殊的行为和规则。首先,setup函数中不能使用this关键字,因为它不会指向组件实例。其次,setup函数必须返回一个对象,该对象中的属性和方法将作为组件实例的属性和方法。最后,setup函数在组件实例创建之前执行,因此你无法在setup函数中访问组件实例。总的来说,
setup函数是 Vue 3 中一个强大且灵活的特性,它简化了组件的配置和逻辑,并提供了更好的响应式支持。
- Setup的实现原理
- 官方在线编译工具:Vue SFC Playground (vuejs.org)
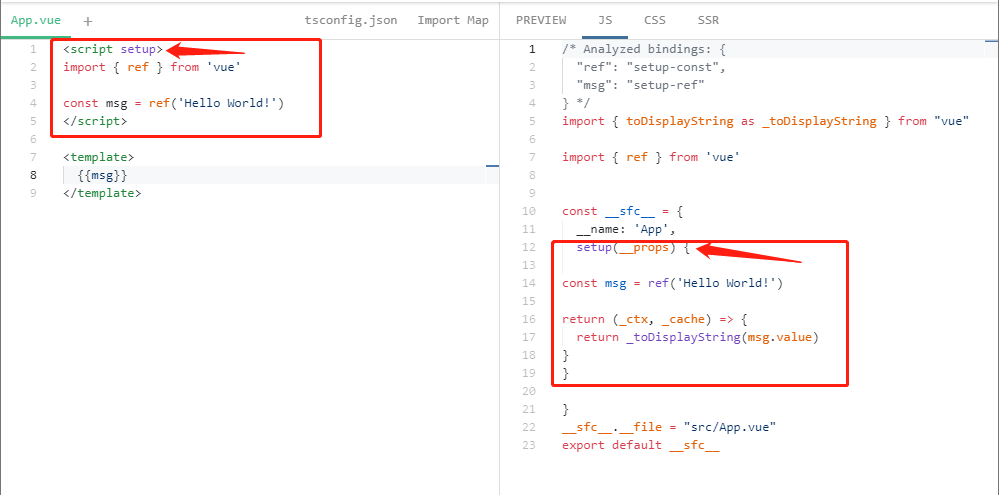
- 可以看到在这个简单的例子中,自动生成了setup函数,并将定义的数据return了出去
- 官方在线编译工具:Vue SFC Playground (vuejs.org)
setup总结
组合式API - reactive和ref函数
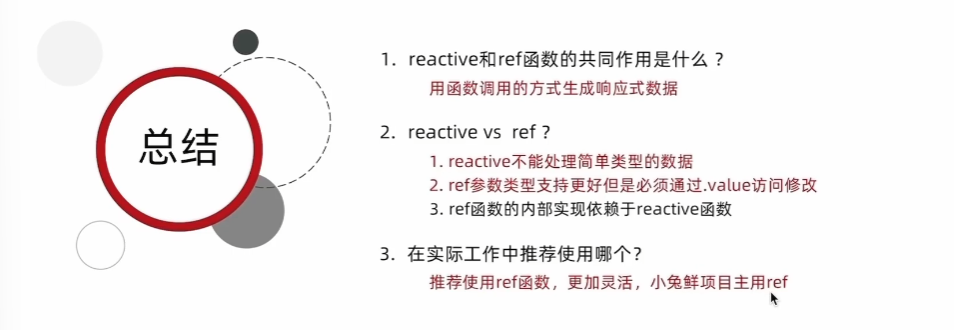
这两个函数都类似Vue2中的data选项,用于生成响应式数据
reactive()
-
作用:
- 接受对象类型数据的参数传入并返回一个响应式的对象
-
使用步骤:
- 从vue中导入这个函数
- 在<script setup> 中执行reactive函数并传入类型为对象的初始值,并使用变量接收返回值
<script setup> import {reactive} from 'vue' const state = reactive({}) </script>- 代码示例:
<template> <button @click="addCount">{{state.count}}</button> </template> <script setup> import {reactive} from "vue"; const state = reactive({ count: 0 }) const addCount = () => { state.count++ } </script>- 注意这里的数据绑定使用了state.count,因为传入的count是在对象内的
ref()
-
作用:
- 接收简单类型或者对象类型的数据传入并返回一个响应式的对象
-
使用步骤:
- 从vue中导入ref函数
- 在<script setup>中执行ref函数并传入值,使用变量接收返回值
<script setup> import {ref} from 'vue' const count = ref(0); </script>- 代码示例:
<template> <button @click="addCount">{{ state }}</button> </template> <script setup> import {ref} from "vue"; const state = ref(0) const addCount = () => { state.value++ } </script>- 注意这里对state的值的修改实际上是修改value属性,这是因为ref的底层是调用reactive实现的。
-
注意点:
-
在 Vue 3 的实现中,
ref函数是通过调用reactive函数来实现的。ref函数的底层逻辑会将传入的值包装在一个对象中,并使用reactive函数将该对象转换为响应式的。具体来说,当你调用
ref(value)时,ref函数会创建一个内部的响应式对象,该对象有一个名 为value的属性,初始值为value。然后,ref函数会使用reactive函数将这个内部的响应式对象转换为一个响应式对象,从而使value成为一个响应式的值。这意味着,通过
ref创建的引用对象本质上是一个包含value属性的对象,而value是响应式的。你可以通过引用对象的.value属性来访问和修改值,而对于引用对象本身的其他属性访问和修改会直接操作内部的响应式对象。因此,可以说
ref是在底层调用reactive来创建一个特殊的响应式对象,使得其值成为响应式的。这种设计使得ref和reactive具有一致的响应式特性,并可以在不同场景下灵活使用。 -
因为ref函数做返回的对象有特殊性,当使用ref创建一个相应数据时,可以直接将这个对象的数据绑定到组件上,而不需要使用对象.value的方式,然而修改这个对象的value属性还是需要通过对象.value进行修改
-
关注点:
- reactive和ref函数在使用时有所不同,前者只能传入一个对象,后者可以传入简单数据,但是两者返回的都是对象类型的属性,然而ref返回的对象具有特殊性,可以直接进行数据绑定,当修改ref对象的值时,需要修改对象中的value属性。
- ref的底层也是调用了react函数实现的,所以返回的都是一个对象。
- 如果不是在脚本区域修改ref产生的对象,而是在模板区域修改其值,可以直接修改,不需要.value
总结:
组合式API - computed计算属性函数
计算属性基本思想和Vue2的完全一致,组合式API下的计算属性只是修改了写法
计算属性的基本思想:通过现有响应数据得出新的响应数据,同时实现响应式数据变化。
-
使用步骤:
- 导入computed函数
- 执行函数在回调函数中return基于响应式数据做计算的值,用变量接收
<script setup> import {computed} from 'vue' const computedState = computed(() => { return 基于响应式数据计算之后的值 }) </script>- 示例代码:
<script setup> // 响应计算 // 计算公式: 始终从原始响应式数组中筛选出大于2的所有项 - filter const nums = ref([1,2,3,4,5]) const evenNums = computed(() => nums.value.filter(n => n > 2)) </script>- 注意这里进行计算的必须是响应式数据,计算得到的也是响应式数据
总结:
- 计算属性中不应该有副作用
- 只是为了完成计算,不应该修改原来的数据或者发起异步请求。
- 避免直接修改计算属性的值
- 计算出的属性应该是只读的,不应该修改。
组合式API - watch函数
watch函数用于监听数据变化,然后执行回调函数
-
作用:
- 侦听一个或者多个数据的变化,数据变化时执行回调函数
- 两个额外参数:
- immediate:立即执行
- deep:深度监听
-
基本使用:
-
侦听单个数据
- 导入watch函数
- 执行watch函数传入要监听的响应式数据(ref对象)和回调函数
<script setup> import {ref,watch} from 'vue' const count = ref(0) watch(count,(now ,old) => { console.log(`count发生了变化,之前的值为#{old},新的值为#{now}`) }) </script>- 代码示例:
<script setup> const nums = ref([1, 2, 3, 4, 5]) const evenNums = computed(() => nums.value.filter(n => n > 2)) watch(evenNums, (newVal, oldVal) => { console.log(`数组发生了变化,新长度为:${newVal.length},旧长度为:${oldVal.length}`) }) </script> -
监听多个数据变化
-
与监听单个数组相比,只需要将多个数据放在一起形成一个数组即可监听多个数据
-
代码示例:
<script setup>
	import {ref,watch} from 'vue'
    const count = ref(0)
    const name = ref('cp')

    watch([count,name],([newCount,newName],[oldCount,oldName]) => {
        执行操作
    })
</script>
-
-
-
参数:
- 在回调函数后还可以通过传入对象的方式携带参数
- immediate:
- 在监听器创建时立即触发回调,响应式数据变化之后继续执行回调
- deep:
- 深度监听选项。
- 默认机制:通过watch监听的ref对象默认是浅层监听的,直接修改嵌套的对象数学不会触发回调执行,需要开启deep选项。
<script setup> ...... watch(state,()=>{ console.log('发生变化') },{ immediate:true, deep:true }) </script> -
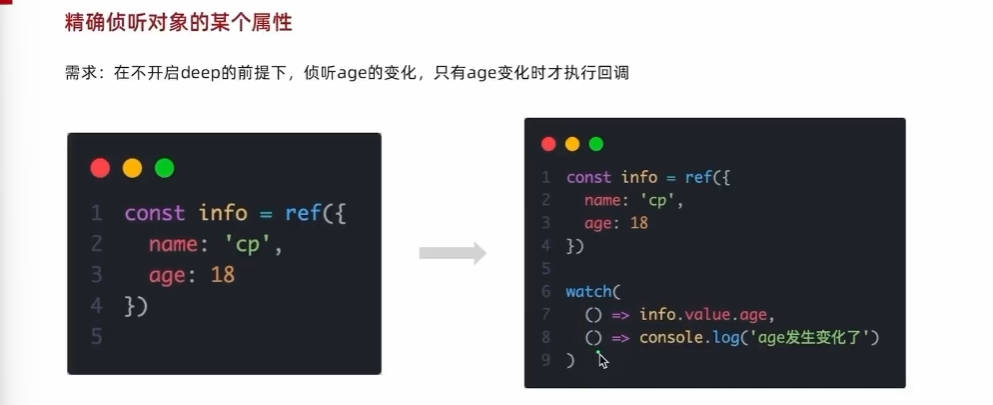
精确监听某个对象中的某个属性
-
需求:
- 在不开启deep的前提下,监听age的变化,只有age变化时才执行回调
<script setup> import {ref,watch} from 'vue' const info = ref({ name:'cp', age:18 }) watch( ()=>info.value.age, ()=>console.log('age发生了变化') ) </script> -
语法:
- 在创建监听时,将监听的对象改为一个回调函数,返回的是需要监听的属性。
- 同理,如果需要监听两个属性,则可以将两个回调函数装在一个数组中传入。
-
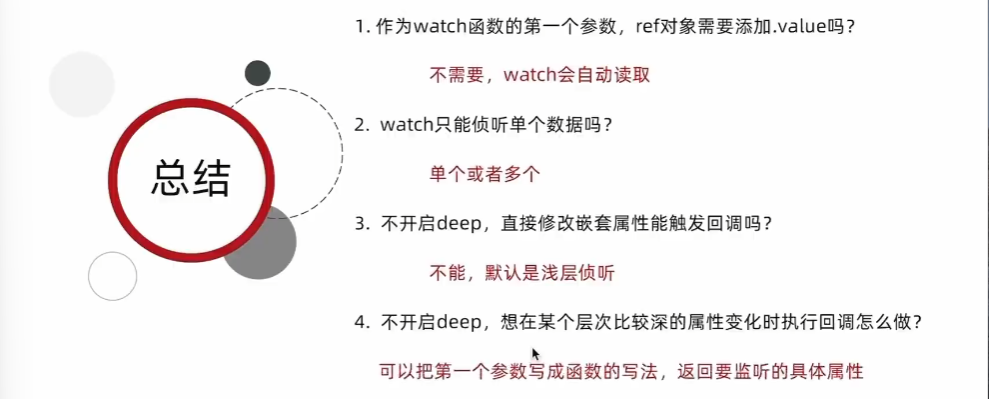
总结:
组合式API - 生命周期函数
Vue3和Vue2的生命周期API
| 选项式API | 组合式API |
|---|---|
| beforeCreate/created | setup |
| beforeMount | onBeforeMount |
| mounted | onMounted |
| beforeUpdate | onBeforeUpdate |
| updated | onUpdated |
| beforeUnmount | onBeforeUnmount |
| unmounted | onUnmounted |
-
生命周期函数的基本使用
- 导入生命周期函数
- 执行生命周期函数 传入回调
<script setup> import {onMounted} from 'vue' onMounted(()={ console.log('组件挂载完毕') }) </script> -
执行多次
- 生命周期函数是可以执行多次的,多次执行时传入的回调会在时机成熟时依次执行
onMounted(() => { console.log('111'); }) onMounted(() => { console.log('222'); })- 会根据函数的注册顺序依次执行,执行的时机依然是生命周期中的时机
- 方便代码的无侵入式修改。
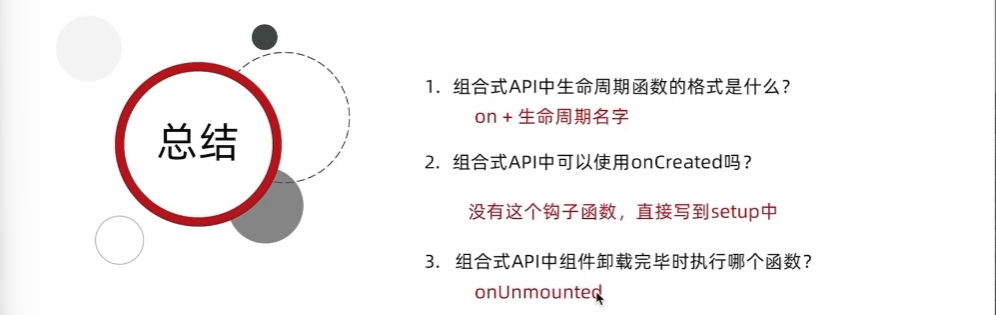
总结:
组合式API - 父子通讯
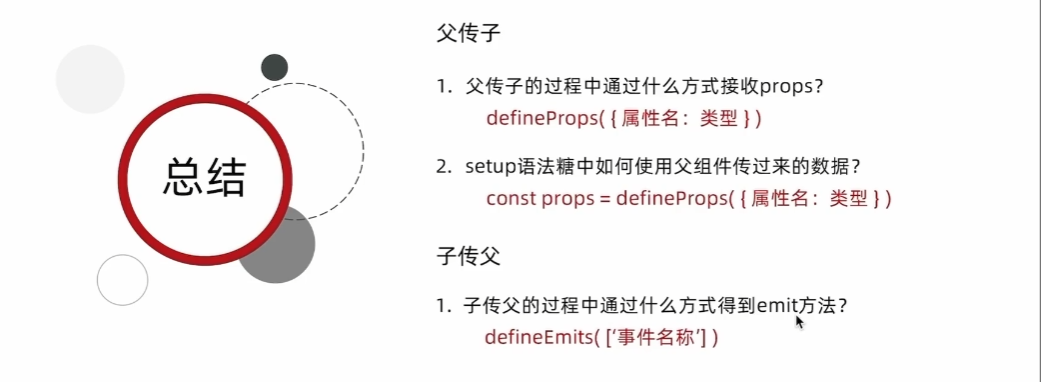
父传子
-
基本思想:
-
父组件中给子组件绑定属性
-
子组件内部通过props选项接收
- 在父组件中引入子组件,在模板区域绑定属性。
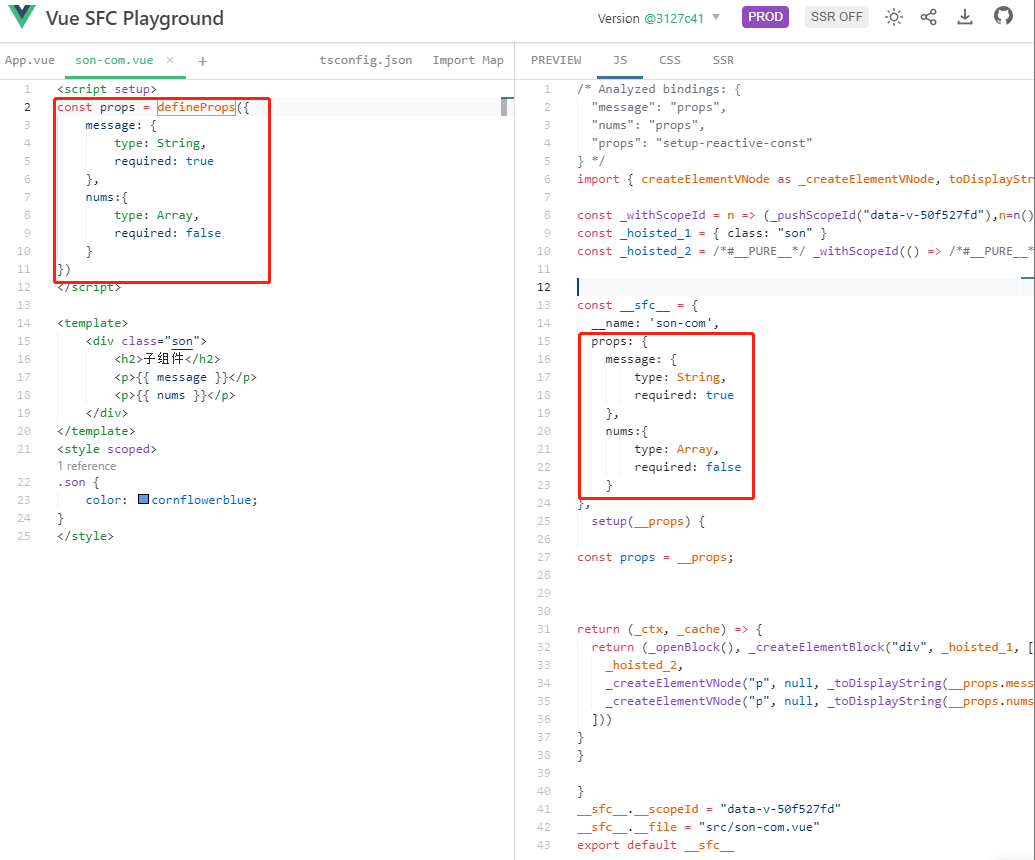
- 在子组件处通过defineProps“编译器宏函数”接收子组件传递的数据
- 父组件:
<script setup> import sonComVue from './son-com.vue' </script> <template> <sonComVue message="This is a app message"></sonComVue> </template>- 子组件:
<script setup> const props = defineProps({ message:String }) </script> <template> {{message}} </template>-
因为有setup语法糖的存在,所以组件导入后可以直接使用而不需要注册。
-
在子组件中defineProps函数不需要显式引入,这是因为其为Vue 3 框架的一部分,在 Vue 3 的编译阶段会进行处理。
-
子组件案例:
<script setup> const props = defineProps({ message: { type: String, required: true } }) </script> <template> <div class="son"> <p>{{ message }}</p> </div> </template> -
这里使用了setup语法糖后defineProps的语法规则如下:
-
defineProps({ 参数名:参数描述,参数名:参数描述}),其中参数描述可以为一个对象,其有以下几个属性:
type(类型):指定属性的数据类型,可以是 JavaScript 的原生数据类型(如 String、Number、Boolean、Object、Array)或自定义类型。例如,type: String表示该属性的类型为字符串。required(必需):指定属性是否为必需的,即在使用组件时必须传递该属性。默认值为false,表示属性不是必需的。如果将required设置为true,则使用组件时必须传递该属性,并且如果没有传递会发出警告。default(默认值):指定属性的默认值。如果使用组件时没有传递该属性,组件将使用默认值作为属性的初始值。例如,default: 'Hello'表示如果没有传递该属性,默认值为'Hello'。validator(验证器):指定一个自定义验证函数,用于验证属性的值是否满足特定条件。验证函数接受属性的值作为参数,并返回一个布尔值。如果验证函数返回false,则会发出警告。
-
:red_circle:注意:这里的props是单向传递的,作为只读属性,对其进行修改不会产生效果。
-
:large_blue_circle:在脚本区使用参数时,只需要将defineProps函数的返回值接受,其里面的属性就是参数。
-
-
绑定响应式数据:
- 使用
:参数="变量名"来绑定响应式数据- 父组件中:
<template> <SonCom message="this is a app message" :nums="nums"></SonCom> </template>-
- 子组件中:
<script setup> const props = defineProps({ message: { type: String, required: true }, nums:{ type: Array, required: false } }) </script>- 这样,这里的nums就是一个响应式对象,父组件中的nums发生变化时子组件也会变化。
- 使用
-
编译之后的代码
- 所谓编译器宏函数就是一个标识,用于告知编译器这段代码的作用,从而将其编译为之前的写法。
子传父
-
基本思想
-
父组件中给子组件标签通过@绑定事件
-
子组件内部通过$emit 方法触发事件
-
在父组件中绑定自定义事件
-
在子组件中通过defineEmits编译器宏来生成emit方法
-
父组件:
<script setup> import sonComVue from './son-com.vue' const getMessage = (msg) => { console.log(msg) } </script> <template> <sonComVue @get-message="getMessage" /> </template>- 子组件:
<script setup> const emit = defineEmits(['get-message']) const sendMsg = () => { emit('get-message','this is a son msg') } </script> <template> <button @click="sendMsg"> sendMsg </button> </template>- 因为有语法糖的存在,所以不使用&emit来进行事件触发。
- 我们使用defineEmits来生成一个函数,这个函数等价于Vue2中的emit函数
- 执行emit方法需要传入多个参数,其中第一个参数为事件名称,后面的参数为事件名对应的方法的参数。
- 当emit方法被调用,传入的事件名会被触发,这时传入的参数会被传入到父组件中被处理。
-
-
子组件案例:
<script setup> const emit = defineEmits(['send-msg']) const sendMsg = () => { emit('send-msg', 'this is a son message') } </script> <template> <div> <button @click="sendMsg">sendMsg</button> </div> </template> -
父组件案例:
<template> <div> <SonCom @send-msg="sendMsg"></SonCom> </div> </template> <script setup> const sendMsg = (msg) => { console.log(msg) } </script> -
注意点
- defineEmits需要传入一个数组,该数组声明了所有当前组件会触发的事件,返回一个emit方法。
- emit方法的第一个参数为事件名称,后面的参数为事件触发函数的参数。
总结
使用
defineProps和defineEmits可以帮助你更好地整合和分离组件,提高代码的可维护性和可重用性。通过
defineProps,你可以定义子组件的属性,并指定其类型、默认值、是否必需等属性配置。这样做可以明确地定义子组件所需的属性,使其更加独立和可配置。父组件在使用子组件时,通过属性绑定的方式将数据传递给子组件,从而实现了组件间的数据通信。这种方式可以提高组件的可维护性和灵活性,因为父组件和子组件之间的数据交互变得清晰明了。类似地,通过
defineEmits,你可以定义子组件可以触发的自定义事件。这样的设计允许子组件在特定的时机触发事件,并将数据传递给父组件。父组件可以在模板中使用v-on或@符号监听子组件的事件,并在触发事件时执行相应的逻辑。这种事件机制可以实现组件之间的通信和交互,提高了代码的可维护性和可复用性。通过将组件分离并使用
defineProps和defineEmits,你可以将组件的功能、界面和数据逻辑清晰地划分,并使它们相互独立和可配置。这种模块化的设计有助于提高代码的可维护性、可测试性和可扩展性。同时,它还促进了团队合作和组件的复用,提高了开发效率。
组合式API - 模版引用
-
概念
- 通过ref标识获取真实的dom对象或者组件实例对象
-
如何使用(以获取dom为例)
- 调用ref函数获取一个ref对象
- 通过ref标识绑定ref对象到标签
- 此时该dom已经存到了该ref的value上
<script setup>
    import {ref} from 'vue'
    const h1Ref = ref(null)
</script>
<template>
    <h1 ref="h1Ref">
        我是dom标签h1
    </h1>
</template>
注意:
- ref传入的值必须为null,否则将会把dom节点的引用覆盖
- setup语法糖将会通过document.getElementById来自动绑定Dom节点
- 简单来说就是通过标签的ref标识将该节点绑定到标签所指的ref对象上
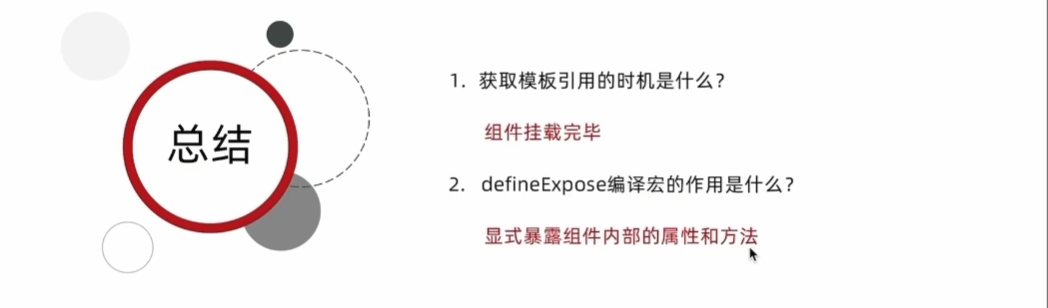
- :red_circle:组件挂载完毕后才能获取到(onMounted及之后)
-
示例
<template> <div> <p ref="pRef"> 我是p标签 </p> </div> </template> <script setup> import {ref, onMounted} from 'vue' const pRef = ref(null) onMounted(() => { console.log(pRef.value) }) </script> -
获取组件实例对象示例
<template> <SonCom message="this is a app message" :nums="nums" @send-msg="sendMsg" ref="sonRef"></SonCom> <p ref="pRef"> 我是p标签 </p> </template> <script setup> import {ref, onMounted} from 'vue' import SonCom from "./components/son-com.vue"; const pRef = ref(null) onMounted(() => { console.log(pRef.value) console.log(sonRef.value) }) const sonRef = ref(null) </script> -
注意点:
- 使用ref可以获取对象,但是reactive不可以,reactive只能用来封装复杂对象成响应式对象。
-
组件实例对象
-
默认情况在setup语法糖下,组件内部的属性是不开放给父组件访问的,可以通过defineExpose编译宏来指定哪些属性和方法允许访问
-
编译宏函数defineExpose:
<script setup>
    import {ref} from 'vue'
    const testMessage = ref('this is a test msg')
    defineExpose({
        testMessage
    })
</script>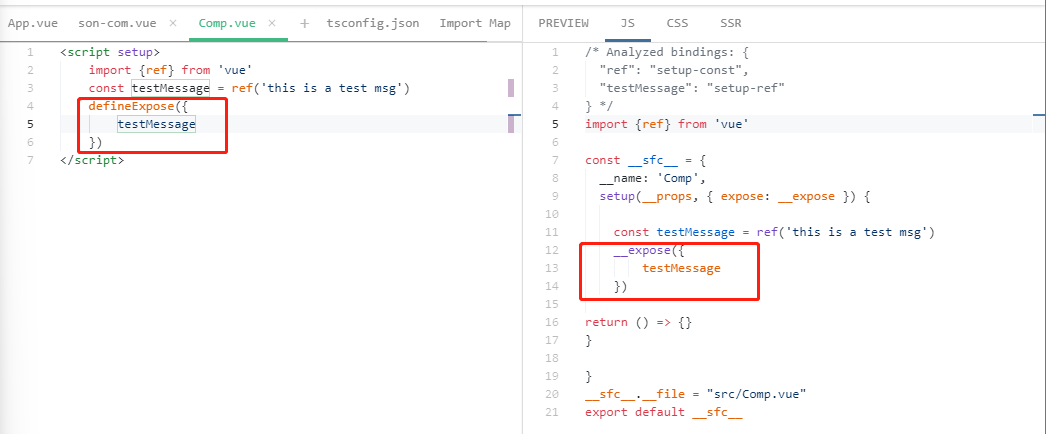
-
在获取到组件实例对象之后,可以直接获取或者执行其中的方法(暴露的)
-
父组件代码:
<template> <button @click="setMsg">设置Msg</button> </template> <script setup lang="ts"> import {ref} from 'vue' import TestRef from "./components/test-ref.vue"; const testRef = ref(null) const setMsg = () => { testRef.value.setMsg('set msg from app') } </script>- 打印组件实例对象如下:

-
子组件代码:
<template>
    {{ msg }}
</template>

<script setup lang="ts">
import {ref, computed, watch, onMounted} from 'vue'

const msg = ref('hello world')
const setMsg = (message: string) => {
    msg.value = message
}
defineExpose({
    msg,
    setMsg
})
</script>
-
-
总结
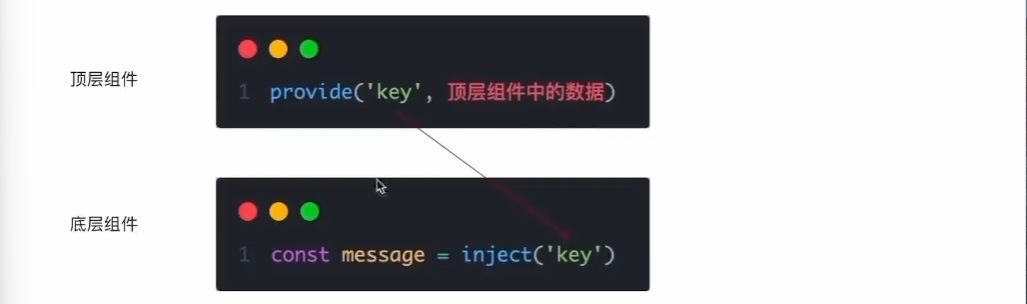
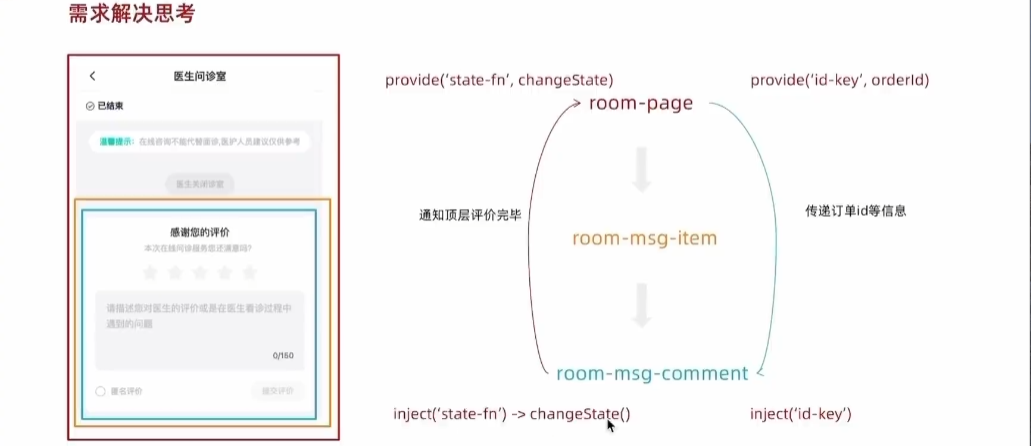
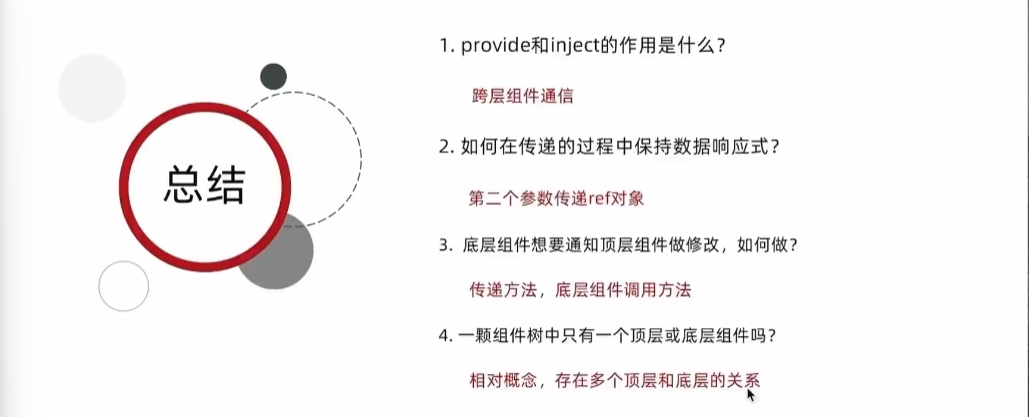
组合式API - provide和inject
-
作用和场景
-
顶层组件向任意的底层组件传递数据和方法,实现跨层组件通信
-
举例:从room-page传递id等信息,从room-msg-comment传递通知信息。
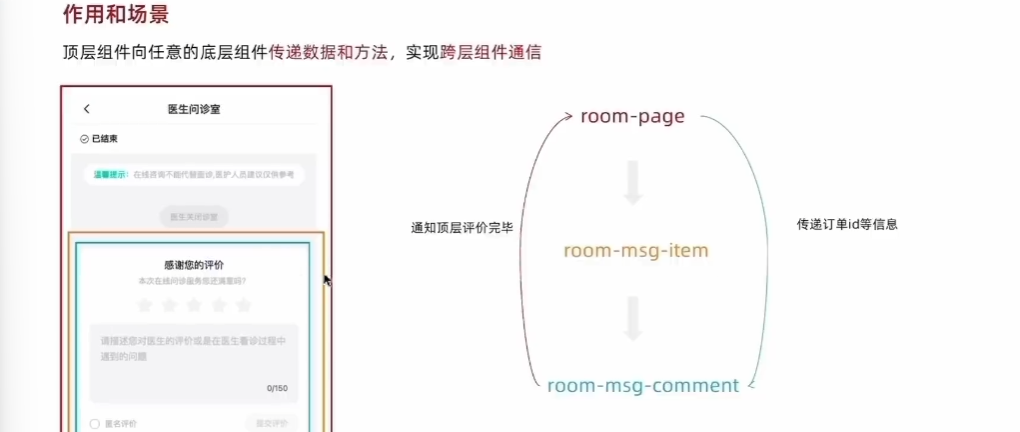
- 这里的room-page就是顶层组件(处于组件树上方)
- room-msg-comment为底层组件(组件树下方)
- :red_circle: 顶层组件和底层组件并不是指页面中的上下位置或者嵌套关系,而是指其在组件树中的位置。
-
-
跨层传递普通数据
- 顶层组件通过provide函数提供数据
- 底层组件通过inject函数获取数据
-
传递响应式数据
- 直接传递ref对象即可
-
跨层传递方法
- 底层组件可以向底层组件传递方法,底层组件调用方法修改顶层组件中的数据
- 根组件:
<template> <SonCom message="this is a app message" :nums="nums" @send-msg="sendMsg" ref="sonRef" ></SonCom> </template> <script setup lang="js"> import {ref, computed, watch, onMounted, provide} from "vue"; import SonCom from "./components/son-com.vue"; // 跨层组件通讯 provide("test", nums); provide("setMsg", (msg) => testRef.value.setMsg(msg)); </script>- 子组件:
<script setup lang="js"> import { inject } from "vue"; import "./son-son.vue"; import SonSon from "./son-son.vue"; const props = defineProps({ message: { type: String, required: true, }, nums: { type: Array, required: false, }, }); </script> <template> ...... <div> <SonSon></SonSon> </div> </template>- 子组件的子组件:
<script setup lang="js"> import {ref, inject} from 'vue' const nums = inject('test'); const sendMsg = inject('setMsg'); const handleSendMsg = () => { sendMsg('this is a message from son-son'); } </script> <template> <p> this is a message from son-son {{ nums }} </p> <div> <button @click="handleSendMsg">sendMsg</button> </div> </template>- 这里通过子组件的子组件,修改了根组件下另一个子组件中的msg,实现了跨层通讯。
-
开发中的重要原则::red_circle: 谁的数据谁负责修改
总结
Vue3综合小案例
-
案例前置说明
-
项目地址
git clone http://git.itcast.cn/heimaqianduan/vue3-basic-project.git
- 模板已经配置好了案例必须的安装包
- 案例使用到的接口在README.MD中
- 案例项目有两个分支,main为开发分支,complate分支为完成版本供参考。
-
-
父组件:
<script setup>
import Edit from './components/Edit.vue'

// TODO: 列表渲染
// 思路: 声明响应数据 -> 调用接口 -> 赋值 -> 绑定 -> 渲染
import {ref} from "vue";

const list = ref([])

// 调用接口
import axios from "axios";
import {onMounted} from "vue";

const getList = async () => {
    const res = await axios.get('/list');
    list.value = res.data;
};

onMounted(() => {
    getList();
});


// TODO: 删除功能
// 思路: 获取当前行的id -> 调用删除接口 -> 更新列表数据

const onDelete = async (id) => {
    console.log(id)
    await axios.delete(`/del/${id}`).then(() => {
        // 从列表中删除
        list.value = list.value.filter(item => item.id !== id)
    });
}


// TODO: 编辑功能
// 思路:打开弹窗 -> 获取当前行的数据 -> 赋值给表单 -> 提交表单 -> 调用接口 -> 更新列表数据
const editRef = ref(null)
const onEdit = (row) => {
    // 回填数据,显示弹窗
    editRef.value.openDialog(row)
}

const onUpdate = (row) => {
    // 更新列表
    list.value = list.value.filter(item => {
        if (item.id === row.id) {
            item.name = row.name
            item.place = row.place
        }
        return item
    })
}

</script>

<template>
    <div class="app">
        <el-table :data="list">
            <el-table-column label="ID" prop="id"></el-table-column>
            <el-table-column label="姓名" prop="name" width="150"></el-table-column>
            <el-table-column label="籍贯" prop="place"></el-table-column>
            <el-table-column label="操作" width="150">
                <template #default="{row}">
                    <el-button type="primary" @click="onEdit(row)" link>编辑</el-button>
                    <el-button type="danger" @click="onDelete(row.id)" link>删除</el-button>
                </template>
            </el-table-column>
        </el-table>
    </div>
    <Edit ref="editRef" @on-update="onUpdate"/>
</template>

<style scoped>
.app {
    width: 980px;
    margin: 100px auto 0;
}
</style>
- 子组件:
<script setup>
// TODO: 编辑
import {ref} from 'vue'
import axios from "axios";
// 弹框开关
const dialogVisible = ref(false)

// 字段
const form = ref({
    id: '',
    name: '',
    place: ''
})

// 打开弹框
const openDialog = (row) => {
    dialogVisible.value = true
    //赋值
    form.value.id = row.id
    form.value.name = row.name
    form.value.place = row.place
}

defineExpose({
    openDialog
})

const onUpdate = async () => {
    await axios.patch(`/edit/${form.value.id}`, {
        name: form.value.name,
        place: form.value.place
    }).then(() => {
        // 关闭弹框
        dialogVisible.value = false
        // 更新列表
        updateList({
            id: form.value.id,
            name: form.value.name,
            place: form.value.place
        })
    })
}

const onCancel = () => {
    dialogVisible.value = false
}

// 调用父组件的更新列表方法
const emits = defineEmits(['onUpdate']);
const updateList = (row) => {
    emits("onUpdate", row)
}


</script>

<template>
    <el-dialog v-model="dialogVisible" title="编辑" width="400px">
        <el-form label-width="50px">
            <el-form-item label="姓名">
                <el-input placeholder="请输入姓名" v-model="form.name"/>
            </el-form-item>
            <el-form-item label="籍贯">
                <el-input placeholder="请输入籍贯" v-model="form.place"/>
            </el-form-item>
        </el-form>
        <template #footer>
      <span class="dialog-footer">
        <el-button @click="onCancel">取消</el-button>
        <el-button type="primary" @click="onUpdate">确认</el-button>
      </span>
        </template>
    </el-dialog>
</template>

<style scoped>
.el-input {
    width: 290px;
}
</style>